
Let’s face it, not all of us have what it takes to be a graphic designer. But what happens to small businesses who don’t have the resources to hire a graphic designer? They do it themselves of course!
If the very thought of designing something strikes terror into your heart, don’t fret, we’ve got you covered. You can create content with Canva, your very own design system that’s super easy to use – no photoshopping required.
Whether you choose to use the free or paid version, both offer a vast range of templates and the option for your design team to create templates for other team members.
What we will cover
We’re going to take you through how to set up an account and create social media content, in particular your branded templates (we promise it is super easy).
Below, you’ll find four tutorials:
- A Canva overview – Navigating the dashboard, key features, how it all works and uploading your brand assets
- Free vs paid version – which one is right for me?
- Image editing – how to add popular effects and adjustments
- Creating designed content for Instagram – creating templates so you can very quickly create visually consistent tiles, stories, highlights and Reels
Canva Overview
In this tutorial, we’ll give you an overview of Canva, showing you how to navigate the dashboard and upload your brand assets!
Video transcript:
- Creating templates: Canva is an online platform, so this means you can access it from any device and all your designs are stored in the cloud. They are saved to your Canva library automatically. You do your designing online and either export your designs to your device or post them directly to social media. You can use the website version or download the desktop app – both work the same. There is a mobile phone app, but I would recommend at least creating your templates on a computer and then if you want to use your phone to use the templates later, you can. It all comes down to how often you’re posting, whether you’re using a scheduler and your preferences.
- Creating an account: First, you need to create an account, which is very quick and easy to do, so I won’t run you through that.
- Navigating the dashboard: I am going to give you a quick tour to show you around the main features, creating a new design, pre-designed templates, the image library, uploading your own content and exporting your designs.
Free vs paid version – which one is right for me?
Video transcript: In this tutorial, I am going to run you through the key differences between the free version and the paid version of Canva. The features we will be looking at include the brand kit, templates, folders, the image library, editing features and export options. Unlike many other services, the free version is great and completely sufficient for many small businesses. However, the value you get with the Pro is considerable and definitely worth considering if it is within your budget.
Some key factors include:
- Price
- Free version: 100% free
- Pro: A$17.99 /month or A$164.99 /year
- Library
You have a much, much larger selection of templates, photos, graphics, videos, audio and fonts with Pro. However, there are brilliant free ones. Definitely filter by ‘free’ if you don’t want to be tempted or disappointed by Pro designs. Something else to note is supplementing Canvas images with free image libraries like Unsplash. If you are already subscribed to a stock image library like Shutterstock or freepik, you might want to consider using Pro instead.
- Brand kits
- Free version: 3 brand colours
- Pro: Per brand kit you can have unlimited colour pallets, logos and custom fonts, and you can have unlimited brand kits
- Templates
The free version doesn’t technically allow you to create templates, but we have a hack that allows free users to create them. The Pro version is a tidier version for managing templates though.
- Folders
Depending on how much content you are creating, folders are super useful for organisation. However, if you’re only using Canva for social media posts, two is fine (we recommend one for ‘brand assets’ and one for ‘designs’).
- Free version: 2 folders
- Pro: Unlimited
- Editing features
Most editing features are available in the free version, however, the main difference is that Pro has a background remover feature, which might be unnecessary for some and a game changer for others.
- Download/exporting and scheduling to Instagram
-
- Free: You can download all file types (png, jpeg, pdf, mp4, gif), except SVGs (SVGs are scale-able and editable graphics).
- Pro: You can download all file types, including SVGs, plus you can change the resolution, compress images, and download pngs with transparent backgrounds. You can also schedule directly to social media. This could also be a good option if you didn’t want to pay for a scheduling app!
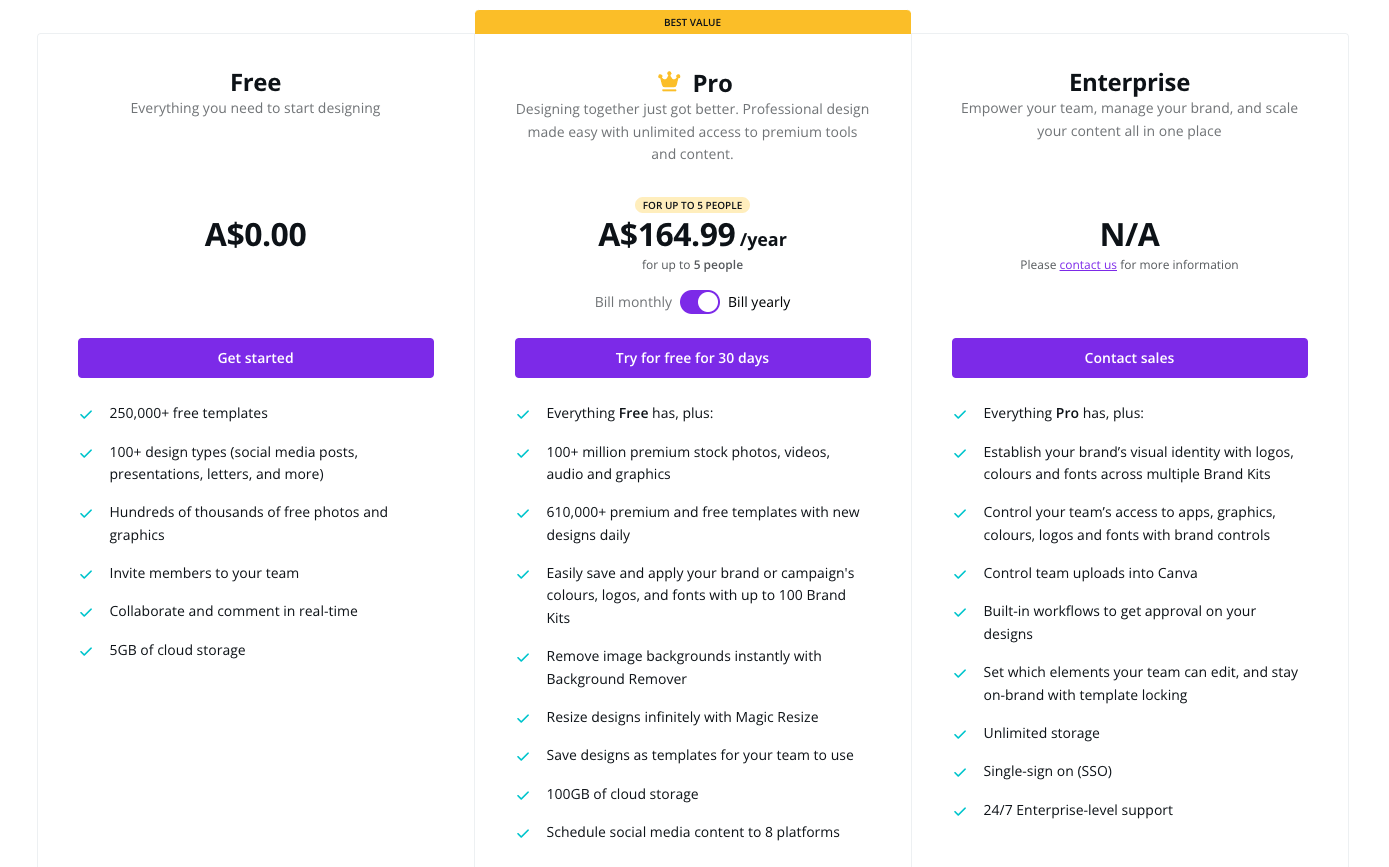
Head to this link to view all the features.
Image editing
Video transcript: In this tutorial I am going to show you some easy image effects that you can use in your designs. In the next video we will take these designs and I’ll show you how to create templates to use the same effects for future posts so you can ensure you maintain consistency throughout your feed – you want your feed to be cohesive!
Effects include:
- Cropping and adding colour effects (desaturate, colour overlays, filters and taking out backgrounds, adding shadows etc.)
Using templates to create branded content for Instagram
Video transcript: Hopefully you’ve identified the sorts of content you want to create, now it is time to make templates for them! For example, you may want to have a template for a photo tile, testimonial tile, general product or service promo tile, quote tile, etc. You may also want to have a particular style for stories that will go into a highlight.
Apply your branding to a pre-designed template
- Not confident in your eye for design? Don’t worry, one of the easiest ways to make templates is to take a Canva designed template (already designed by their design team) and apply your branding to it. This means changing the colours, fonts and imagery (where necessary) to suit your brand. I’ll show what to look for when picking a design, you want a design that is going to be easily adapted to your content and suits your branding.
- Canva templates do update very regularly and while it is great to be aware of design trends, make sure you don’t change your visual look just to jump on a trend – you still need to apply your branding. Brand consistency is key!
Create your own custom template
- If you do have an eye for design, you might want to create a completely custom template. Here you will use your brand kit and create a design from scratch.
Use your design as a template
- Once you are happy with your design, you can now use it as a template! If you have Pro, simply click ‘Save’, type in template and save it as a template. Now whenever you want to use that template you will just need to select it from your library (or whatever folder you save it in) and create a new design based off it. If you are using the Free version, you will leave this file as is, but name it accordingly, and simply duplicate it whenever you want to use it. DO NOT EDIT OVER IT. You need to be careful with your labelling here.
Export it!
- When you create a new design using the template and are ready to export it, you have a few different options – the Pro version has an option to schedule directly to Insta, but if you are using the Free version or a scheduler, you will want to download as a ‘high quality PNG’. We recommend PNGs over JPEGs for Canva, as Canva can over-compress the JPEGs, causing your Insta posts to be blurry.
- Quick hack: If you are still finding your images are blurry, double the template image size. For example, from 1080 x 1080px to 2160 x 2160px, or if using Pro download as 2x the size. This will create a larger file size but your images will be crisp and clear!
Branding and design are often a nerve-wracking thought, especially for those of us who don’t know our primary from our secondary colours! Creating content with Canva is a great way to manage brand consistency and cohesion in your social media feeds.
If you’d like a hand with Canva or would like to know what your branded feed could look like, get in touch today.




One Response